Table of Contents
Xpanda
![]() Updated
by tune
Updated
by tune
Manual Xpanda compression plug
Thank you for purchasing tune products! Our products are designed and manufactured to the highest standards. This manual informs you about the proper handling and care of our products.
Introduction
Our components are high-end parts and must always be assembled and used in accordance with the user manual. Please read this manual carefully and follow the instructions. If you are not confident with the assembly, please contact your dealer.
Assembly
Assembly preparation
Before you can start with the assembly, the compatibility of the steerer tube must be checked:
- Use a digital caliper to measure the inside dimensions of your steerer tube all around. The Xpanda is suitable for steerer tube inner diameters of 22.1 - 25.2mm. Due to the possible oval shape of the steerer tube, multiple measurementes are crucial.
- The steerer tube must be sawed off clean and straight. An inclined support surface influences the function of the Xpanda. A sloping support surface must be corrected before assembly.
- If the steerer tube of the fork meets the assembly requirements, assembly can begin. If the steerer tube is outside the permissible tolerance, the Xpanda can not be installed!
Construction of the Xpanda
The following image shows the construction of the Xpanda. The parts are named below the image.
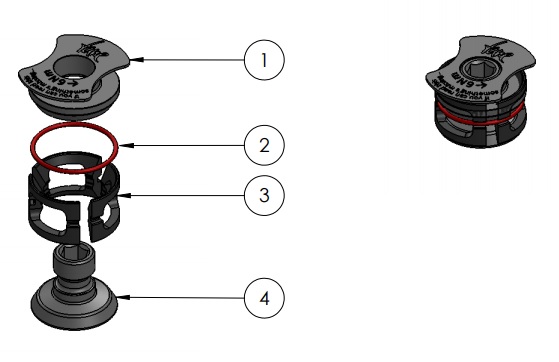
- Support plate
- O-Ring - 18x1,5mm, silicone
- Spreading segments
- Lower spreader
Assembly of the Xpanda
After completing the assembly preparations with a positive result, follow these steps to mount the Xpanda:
- Apply the enclosed carbon assembly paste thinly to the inside of the steerer tube. The paste increases the friction and thus improves the clamping effect.
- Loosen the screw of the Xpanda to enable it to be inserted into the steerer tube. Do not completely dismantle the Xpanda!
- Insert the Xpanda into the steerer tube. The support plate prevents it from falling into the steerer tube.
- Tighten the screw of the Xpanda in the lasered direction. By tightening the screw, the Xpanda is spread and expands in the steerer tube. Do not exceed the max. tightening torque!
- Screw the screw of the ahead cap (ahead cap and screw available separately) into the Xpanda and use it to pretension the headset.
Tightening torques
Fastener | Torque |
Lower spreader Xpanda (Attention: The screw is tightened turning anti-clockwise!) | Max. 6Nm |
Intended use
Our products are designed and tested according to the current standards, which define the safety requirements and test methods for mountain bikes off-road and racing bikes for amateur use on public roads. In both cases, the standards for bikes with adjustable saddle height with a minimum saddle height of 635mm apply.
The standards mentioned do not apply to special types of bicycles such as tandems or bicycles which are used for special applications such as tough competition, stunts or acrobatics.
The standards also do not apply to bicycles with a saddle height ≤ 435mm and a saddle height between 435mm and 635mm.
Storage & transport
When storing or transporting tune components for a longer period of time, follow these guidelines:
- Components must be stored and transported at a temperature of 15-30°C and max. 70% relative humidity.
- Components must not be exposed to direct or indirect sunlight. Ideally, storage and transport take place in a dark place or covered.
- Avoid large temperature fluctuations, e.g. in a car parked in the sun. Torques must be checked again after storage or transport with large temperature differences to ensure proper function.
- Components must be cleaned and checked for proper function before storage. Before the next operation, a new check for functionality must be carried out.
- Wheels should be stored and transported with the tyres fitted. The mounted tyre reduces the spoke tension and thus the load on the hub flange.
- Do not hang up carbon rims or entire bicycles, as the point load can cause permanent damage to the rim.
- Do not hang up stored bicycles by the saddle to reduce the load on the saddle and seat post.
Maintenance & care
Depending on the conditions of use and the frequency of use, your tune components must be cared for and maintained in order to preserve their function and appearance for a long time.
You can find out more about how to care for your components here:
Here you will find information on the mandatory maintenance intervals:
Warranty & Crash Replacement
We offer a voluntary warranty on our products to protect against material or workmanship defects. For self-inflicted defects, we offer a Crash Replacement program to get you back on your bike as quickly as possible.
Here you can find out everything about our warranty:
Here you can find information about the Crash Replacement program:
Disposal & recycling
After a defect or after the service life has been exceeded, waste must be disposed of properly. Waste is a valuable raw material and correct disposal protects the environment.
Here you can find out more about the disposal of various materials: