Table of Contents
Leichtes Stück & Stakes Stück
![]() Updated
by tune
Updated
by tune
Manual Leichtes Stück & Stakes Stück
Thank you for purchasing tune products! Our products are designed and manufactured to the highest standards. This manual informs you about the proper handling and care of our products.
Introduction
Our components are high-end parts and must always be assembled and used in accordance with the user manual. Please read this manual carefully and follow the instructions. If you are not confident with the assembly, please contact your dealer.
Assembly
Assembly preparation
Before you can start with the assembly, the compatibility between seat tube, frame and saddle must be checked:
- The rails of the desired saddle must have a diameter between 7-8mm and a center-to-center distance between 43-44mm. The assembly of saddles with oval rails is possible. The saddles from our product portfolio are compatible with our seatposts.
- The frame compatibility depends on the inside diameter of the seat tube and the outside diameter of the seatpost. The two nominal dimensions must match and may differ from each other by a maximum of 0.2mm in order to be able to mount the seatpost in the frame. To check compatibility, the inside diameter of the seat tube and the outside diameter of the seatpost must be measured all around with a digital caliper.
- In order to ensure proper usability of the seatpost, the necessary seatpost height for the desired seating position must be accessible. The length of the seatpost must be selected depending on the frame size, body size and saddle model. The following table provides information on the insertion depth, clamping area and usable height of the seatpost:
Model | Length | Max. usable height | Length clamping area | Min. insertion depth |
Leichtes Stück 340mm | 340mm | 250mm | 80mm | 90mm |
Leichtes Stück 420mm | 420mm | 320mm | 60mm | 100mm |
Starkes Stück 340mm | 340mm | 250mm | 90mm | 90mm |
Starkes Stück 420mm | 420mm | 320mm | 90mm | 100mm |
Mounting the seatpost to your frame
After completing the assembly preparations with a positive result, follow these steps to mount the seatpost:
- Check the seat tube for dirt and burrs. If present, clean and deburr the seat tube.
- Check the seatpost for dirt on the clamping area. If present, clean the seatpost.
- Apply a thin film of the enclosed assembly paste to the clamping surface of the seatpost.
- Insert the seatpost into the frame. The seatpost clamp must already be installed before inserting the seat post! Installation after inserting the seat post is not possible! When inserting the seatpost, make sure it is correctly oriented! The longer part of the insertion slope at the lower end of the seatpost must point in the direction of travel!
- Set the desired seat height by moving the seatpost. A repeatable setting can be made using the marking on the back of the seatpost. The marking also serves as a control for the correct installation direction. After installation, the marking must point against the direction of travel!
- Tighten the screw of the seatpost clamp while not exceeding the max. tightening torque in order to fix the seatpost in the frame.
Mounting your saddle to the seatpost
Follow these steps to mount your saddle to the seapost:
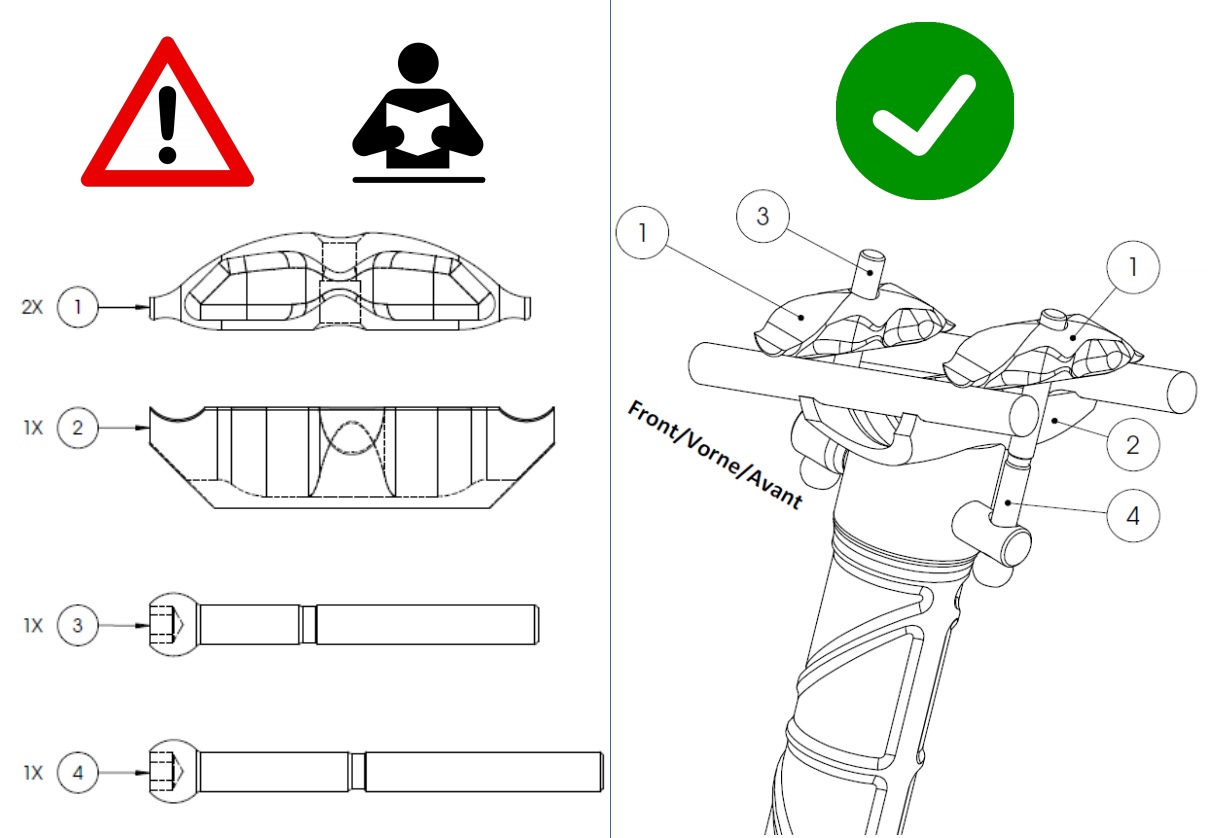
- Lay out the individual parts of the clamping subassembly and arrange them according to the following illustration (attention: the screws have different lengths!). The shorter screw is located towards the front of the bike. The correct mounting position of the claws can be seen in the illustration!
- Place the saddle with the rails on the rocker of the seatpost and align the claws by turning them to fit the rails.
- Tighten the saddle by hand by alternately tightening the two screws until the saddle held in place by a slight tension.
- The correct horizontal position of the saddle can be ensured with the aid of a spirit level. If the incline is incorrect, loosen one screw and tighten the opposite screw to adjust the angle.
- After adjusting the inclination, tighten one of the fastening screws to the specified torque. Important: only tighten one of the screws with torque! The second screw is also tensioned due to the rocker of the clamping mechanism. If both screws are tightened with torque, the clamping can be overloaded.
- After assembly, the correct fit of all components should be checked by firmly shaking the saddle and seat post. After the first trip, the torque of the components should be checked again and adjusted if needed.
Mounting a saddle bag
Tightening torques
Fastener | Torque |
Screws saddle clamp (Attention: only ONE of the two clamping screws needs to be tightened with the torque value! Due to the yoke design the second screw is tightened accordingly!) | Max. 4Nm |
Seatpost clamp | Max. 5Nm |
Intended use
Our products are designed and tested according to the current standards, which define the safety requirements and test methods for mountain bikes off-road and racing bikes for amateur use on public roads. In both cases, the standards for bikes with adjustable saddle height with a minimum saddle height of 635mm apply.
The standards mentioned do not apply to special types of bicycles such as tandems or bicycles which are used for special applications such as tough competition, stunts or acrobatics.
The standards also do not apply to bicycles with a saddle height ≤ 435mm and a saddle height between 435mm and 635mm.
Storage & transport
When storing or transporting tune components for a longer period of time, follow these guidelines:
- Components must be stored and transported at a temperature of 15-30°C and max. 70% relative humidity.
- Components must not be exposed to direct or indirect sunlight. Ideally, storage and transport take place in a dark place or covered.
- Avoid large temperature fluctuations, e.g. in a car parked in the sun. Torques must be checked again after storage or transport with large temperature differences to ensure proper function.
- Components must be cleaned and checked for proper function before storage. Before the next operation, a new check for functionality must be carried out.
- Wheels should be stored and transported with the tyres fitted. The mounted tyre reduces the spoke tension and thus the load on the hub flange.
- Do not hang up carbon rims or entire bicycles, as the point load can cause permanent damage to the rim.
- Do not hang up stored bicycles by the saddle to reduce the load on the saddle and seat post.
Maintenance & care
Depending on the conditions of use and the frequency of use, your tune components must be cared for and maintained in order to preserve their function and appearance for a long time.
You can find out more about how to care for your components here:
Here you will find information on the mandatory maintenance intervals:
Warranty & Crash Replacement
We offer a voluntary warranty on our products to protect against material or workmanship defects. For self-inflicted defects, we offer a Crash Replacement program to get you back on your bike as quickly as possible.
Here you can find out everything about our warranty:
Here you can find information about the Crash Replacement program:
Disposal & recycling
After a defect or after the service life has been exceeded, waste must be disposed of properly. Waste is a valuable raw material and correct disposal protects the environment.
Here you can find out more about the disposal of various materials: